Table of Content
- Change Log
- WARNING
- Introduction
- Shell Trimming
- Battery Door Triming
- LED Pipe Installation (Coming soon...)
Change Log
[0.9.0] - 2017-12-17
- Initial release, LED Pipe Installation missing
WARNING
Your new battery pack uses a 1700mAh rechargeable Lithium-ion polymer (LiPo) battery. This battery is fragile and should be handled with care. As with all LiPo batteries, it can leak, ignite and explode if not handled properly. By installing this Battery Pack you acknowledge these facts and take full responsibility over your actions.
DON’T FORCE THE BATTERY TO FIT. TRIM MORE PLASTIC UNTIL YOU GET A GOOD FIT.
DON’T TAKE THE BATTERY PACK IN AND OUT MULTIPLE TIMES. ONCE INSTALLED, LEAVE IT THERE.
DON’T LEAVE YOUR CONSOLE UNATTENDED CLOSE TO ANY SOURCE OF HEAT.
Introduction
This tutorial explains how to install our Gameboy Advance Rechargeable Battery Pack. You will learn how to properly trim your GBA shell and battery door to get a perfect looking result.
Shell Trimming
To fit the GBA Battery Pack inside your Gameboy Advance, the shell will require a bit of trimming. A YouTuber called This Does Not Compute made a YouTube video (https://youtu.be/u61yfO-YeMo) that shows it all, we highly suggest you watch the video before reading the rest of this guide. Note: that video shows them removing the back of the shell. This is unnecessary if you are willing to just pull hard on the battery spring contact (#1 below).
Trimmed battery compartment
Required Tools
Steps
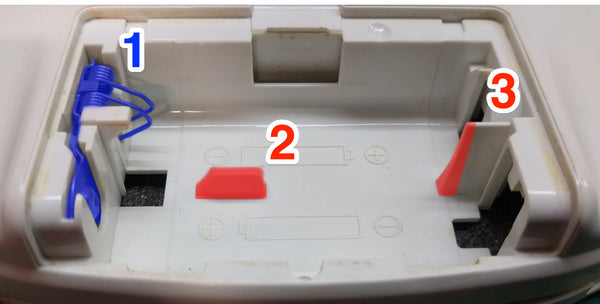 Modification areas
-
Remove the battery spring contact. There is a small metal pin that can be pushed from the inside of the back cover to help you releasing the spring. The plastic pin holding the spring can be pulled gently to release it. Take it out with your pliers. This can be done without opening the shell, but it takes much more force and can therefore cause damage.
-
Cut out the middle plastic notch. The center plastic notch that is used to hold both batteries in place must be removed. Cut it off with your diagonal cutters. Once removed, use your rotary tool, sandpaper, or hobby knife to level the plastic. You should be able to move your finger over the area and not feel anything sticking up. Any leftover plastic will create vertical pressure against the LiPo battery, and that must be avoided.
-
Trim part of the side plastic. We usually remove around 2 mm from the base going straight up. Less than 2mm will likely result in horizontal pressure against the battery, and again that must be avoided.
-
Final adjustments. Try to fit in the battery and make any necessary adjustment. Install the battery pack, visually inspect all parts that touch the battery to find any pressure points, and trim as necessary. Repeat this process until everything fits without any pressure.
-
Power on. Do not forget to turn on the battery pack by putting the power switch in the ON position!
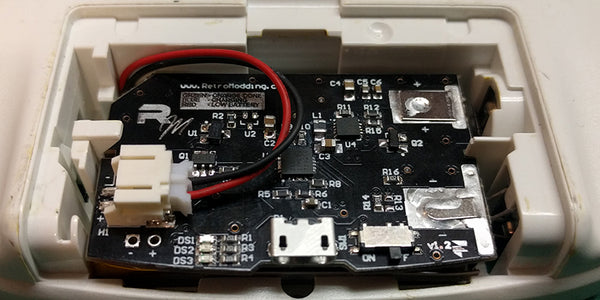 Battery Pack In place
Battery Door Trimming
Once the Battery Pack is installed, you are not required to alter your console's battery door to charge it but it does make the overall result look better and more convenient to use. You can charge your console with the battery door removed and put it back on when not charging. Even though it does prevent dust from getting in, it's not as convenient.

Trimmed battery door with charging Battery Pack
Required Tools
Steps
-
Delimit carving area. Once the Battery Pack is installed, put on the battery door, use your hobby knife to carve a rectangle around the desired hole area.

-
Rough initial carving with drill. Use a 3/32 drill bit to drill 3 rough holes in the carving area, just enough to fit our precision file.

-
Final touch with precision file. Use your precision file to carve the hole until you get a perfect result. We try to keep the area it as small as possible to fit our charger cable.

LED Pipe Installation (for opaque shells)
Coming soon...


 Modification areas
 Battery Pack In place


Leave a comment